Custom Reports
This feature is available in Enhanced Asset Management.
The Custom Reports Wizard allows you to create reports that meet a variety of needs. In addition, you can modify the standard reports to accommodate any reporting needs that you have.
Custom reports from 2018 can be rolled from the Rollover Manager. Click the Rollover Manager tab and select the Custom Reports check box in the Other Data section.
To create a custom report, use the following steps:
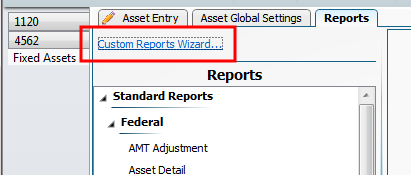
- Click the Reports tab within an open return.
- Click the Custom Reports Wizard link.

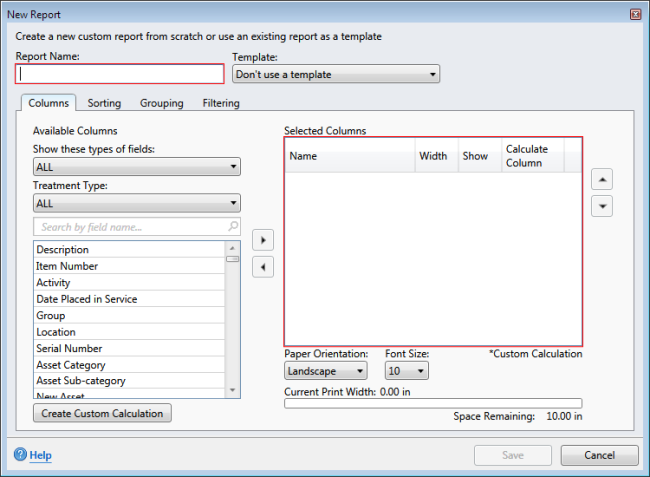
Enhanced Asset Management displays the New Report dialog:

New Report dialog box
- Enter the name of the report.
- If you wish to use one of the reports provided or one of your custom reports as a template, select the report from the drop-down list.
- Complete the Columns, Sorting, Grouping, and/or Filtering tabs. The options on these tabs are explained below.
- After saving the report, it will be saved under Custom Reports for use in the future.
The Custom Reports functionality in ATX does not include the following fields/functions: book or ACE depreciation, multi-state reporting, calculation periods, GL accounts, cents, journal entries, and period detail.
Columns
The Show these types of fields drop-down menu allows you to select the type of fields you wish to choose from for your report. The default is ALL, but you have the option to select Common, General Asset Info, Depreciation and Section 179, Auto/Listed, and Dispositions and Bulk Dispositions.
After selecting the type of fields, do the following:
- Select each column and use the arrow keys located in the middle of the dialog to move the desired columns to the Selected Columns pane.
To create a custom field, click the Create Custom Field button. See the Create Custom Calculation section for more information.
- To change the position in which a column appears, highlight the column in the Selected Columns pane, and click the arrow located on the right of the dialog to move the column up or down to the desired position in the report.
- Select the check box in the Calculate Column Total to have the report calculate the total for that column.
- The print width of the report depends on whether you have the Paper Orientation set to Landscape or Portrait. The progress bar will indicate how much space is remaining. If needed, you can change the font size of the report.
The Show check box is selected by default when creating a custom report. If for some reason you do not want the column to show in the report you, can de-select the check box.
Sorting
On the Sorting tab you have the option to set up how the custom report is sorted. You are able to set the column name and whether you want the column to sort ascending or descending. The buttons on the right side of the dialog allow you to add, delete and set the sort type.
Grouping
The Grouping tab allows you to group items together by column name. The buttons on the right side of the dialog allow you to add, and/or delete the grouping.
Filtering
The Filtering tab allows you to filter columns by adding conditional filters. You need to select the condition, column name, operation, and enter a value if necessary. The buttons on the right side of the dialog allow you to add and/or delete the filtering.
See Also: